

9 Steps To BBQ Pitmaster Status

The sun is out, the weather is warm, it’s time to get the grill out!
Who doesn’t love barbecues? Just the smell of charcoal mingled with the aroma of delicious meat…..it just screams ‘summer!’
Now, perhaps you’re a little nervous? Perhaps you’ve never manned a grill before? Or perhaps you’ve had the odd mishap? Nuked steaks, underdone burgers…..we’ve all been there.
Let’s face it, guys are extremely competitive, whether we admit it or not. Outdoor grilling, well that’s a man’s job. And yet, no one actually teaches us how to do it.
We’re just expected to know! Read our 9 steps and everyone will assume you’re just born with ‘the knowledge.’ Don’t worry, we won’t tell anyone!
Step 1. Be prepared for flare-ups
Nothing makes you look like a newbie than getting flare-ups. Yet, they can happen to even the most experienced pitmasters.
Fill a spray bottle with water and keep it handy near the grill. When you get a flare-up, just nonchalantly dowse the flames and give off the air of ‘no problemo!’
Step 2. Preparation is key
Looking like an expert griller is not always just about how you cook on the grill. It’s also about paying attention to the raw ingredients.
When cooking steak, choose steak where there is marbling (specks and strands of fat between the muscle tissues).
It’s these little bits of fat that will melt on the grill and make your meats succulent and full of natural taste.
If you only have lean steak to hand, do not cook beyond medium at the absolute most as otherwise it will become tough. If anyone orders ‘well done’ lean steaks, either ignore them, or tell them to trust you as you’re the expert!
Step 3: Don’t take cooking orders for burgers
Hamburgers are another food item where you should not take cooking orders. There’s more bacteria in ground meat than in slabs of meat, so make sure all burgers are well done with no pink inside.
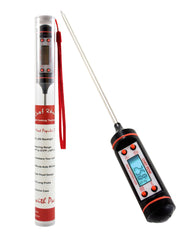
If you’re unsure, stick Chef Remi’s Digital Cooking Thermometer into the center of your burgers, and make sure they have reached at least 160°F.
Ignore anyone who says they prefer their burgers rare. That’s the same person who, after spending the night in E.R. vomiting up your rare burger, will tell your whole neighborhood what a bad grill cook you are!
Step 4: Learn the art of cooking chicken ‘just right’
Chicken is a funny meat. When done correctly, it tastes melt-in-the-mouth gorgeous.
The problem comes in working out when your chicken is ‘done’. Slightly overcook it, and it tastes like rubber. Be cautious and take your chicken off the grill too soon? That’s a one-way ticket to throwing up your guts!
If you’re unsure about how to judge when your chicken is cooked just enough to be safe, and yet is still succulent, stick Chef Remi’s Digital Cooking Thermometer into the center of each piece, and make sure they have reached 165°F.

Step 5: To season, or not to season, that is the question!
If cooking chicken with skin on, rub the skin with a little oil or butter, and sprinkle on salt and pepper. The skin will crisp up beautifully and will keep the inside meat juicy.
If you’re using chicken with no skin on, NEVER season with salt whilst grilling. The salt will draw out moisture during grilling, rendering your chicken into slightly better tasting leather!
Instead, grill without seasoning and add sauces…….which leads to the next step…..
Step 6: No tomato-based sauces until the last ten minutes of cooking
Nearly all tomato based sauces, such as barbecue sauce, contain sugar. It’s this sugar that turns meat black when applied too early.
We all love our sauces, so use them literally for the last 10 minutes of cooking. That’s enough time for the heat to get some of the deliciousness into the meat without the sugars turning the meat black.
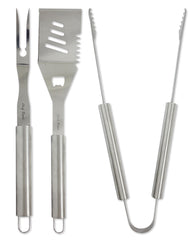
Step 7: Forks are not skewers!
Nothing quite marks you out as a newbie than you poking and piercing meat with prongs or forks.
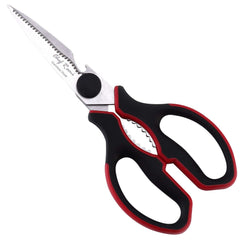
Doing this allows the juices from the meat to escape, causing the meat to become dry and tasteless. Use the spatula or the tongs in the Chef Remi BBQ Tool Set to flip or move food about.
Step 8: Master the art of grilling vegetables
Much is talked about burgers, steaks, chicken wings etc when it comes to grilling. But a real grill master knows that what sorts the men from the boys is in the detail. Hint: The vegetables are the detail!
Large vegetables can be awkward to cook on a grill. Charred, inedible half of a potato with an adjoining raw half? Such a newbie!
Here’s a great tip. Simply wrap large vegetables, such as corn ears or potatoes, in aluminum foil with a heavy dose of butter and seasoning inside. Now you can just throw onto the grill and turn at the same time as you turn the meats – simple!
Step 9: Never clean a grill grate again
Even the most ardent, fanatical barbecue maestro HATES clogged, gunky grill gates.
After a great day drinking beers with your friends and cooking up a gourmet barbecue feast, do you really want to start scraping and rubbing off dried foods?
All grill enthusiasts know that the key is Chef Remi’s Grill Mats. Stick them on your grill, place your foods on the mats, and the food never touches the grates.
Yup, you’re worried that you won’t get those awesome looking sear marks on your steaks and burgers, right?
That’s what happens with inferior mats that really ought to be used as just place mats!
Use the Chef Remi Grill Mats, and you’ll find the heat sears right through to the food, so you still get those grill marks…..without the mess and cleaning up.
Now YOU can be the one intimidating the other guys with you BBQ prowess!


Comments
John Gray#1
WELL DONE!! Even some of us with plenty of grill experience can do well with a refresh. and great advice to ignore those who want rare burgers, better safe than sorry any day. Thanks for the tip, now i know why my bbq always tastes burnt. i put it on too early.